📖 File 예제 (1)
File Class 메소드 사용해보기
package day19;

import java.io.File;
import java.io.IOException;

public class IOEx01 {

	public static void main(String[] args) {
		// C:\Windows\system.ini
		File f = new File("C:\\Windows\\system.ini");
		long size = f.length();
		System.out.println(size);
		// 파일 이름
		String name = f.getName();
		System.out.println(name);
		// 파일 경로
		String path = f.getPath();
		System.out.println(path);
		// 상위 폴더
		String parent = f.getParent();
		System.out.println(parent);
		// 파일타입 판별
		if(f.isFile()) System.out.println(f.getAbsolutePath() + "는 파일입니다.");
		else if(f.isDirectory()) System.out.println(f.getAbsolutePath() + "는 디렉토리다.");
		System.out.println("숨김 속성: " + f.isHidden());
		System.out.println("읽기 속성: " + f.canRead());
		System.out.println("쓰기 속성: " + f.canWrite());
		System.out.println("마지막 수정 날짜: " + new java.util.Date(f.lastModified()));

		File f2 = new File("C:\\Windows\\");
		File[] subfile = f2.listFiles();
		for(int i = 0; i<subfile.length; i++) {
			System.out.print(subfile[i].getName());
			System.out.println("\t 파일크기: " + subfile[i].length());
		}

		File f3 = new File("d:\\dandico\\kor.txt"); // dandico 있는거고 그 이후는 이제 만들것이다
		try {
			f3.createNewFile(); // 외부에 있는걸 할때는 예외처리 강제로 하는것이 많음, 자바에서 건들일 수 있는 영역이 아니기 때문에
		}catch(IOException e) {
			System.out.println(e.getStackTrace());
		}

	}
}
🖥️ console 출력 화면

🔈 파일경로를 넣을때는 확장자명까지 써줘야 한다. 그리고 백슬래시는 \\ 두번 써줘야 \로 인식하기 때문에 경로 넣을때 주의해야 한다.
📖 File Class 예제 (2)
폴더 생성하기
package day19;
import java.io.File;
public class IOEx02 {

	public static void main(String[] args) {

		File f1 = new File("D:\\dandico\\java_sample"); // 생성할 폴더명 객체 생성할때 넣어줘야 함
		if(!f1.exists()) { // 현재 같은 경로의 같은 이름의 것이 존재하지 않으면
			f1.mkdir(); // 폴더 생성해라
		}

		f1.renameTo(new File("d:\\dandico\\javaSample"));
	}

}
📁 폴더 생성

🔈 폴더 or 파일 생성시 생성할 경로를 넣어준후 생성할 폴더명,파일명(확장자까지) 넣어줘야 한다.
📖 FileOutputStream 예제 (1)
파일을 생성하고 파일 써보기 - 내용은 미리 만들어 놓은 byte 배열 쓰기
package day19;

import java.io.FileOutputStream;
import java.io.IOException;

public class FileOutputEx01 {

	public static void main(String[] args) {

		byte [] b = {5,55,-99,8,17,6};

		try {
			// 파일 출력 스트림 생성
			FileOutputStream fout = new FileOutputStream("d:\\yje\\test.out");
			// 파일 쓰기
			for(int i = 0; i<b.length; i++) {
				fout.write(b[i]);
			}
			// 한번에 쓰기
			//fout.write(b); // parameter를 배열로 받는 오버로딩된 write() 메소드가 있어서 가능
			// 스트림 닫기
			fout.close();

		} catch (IOException e) {
			e.printStackTrace();
		}

	}

}
📁 파일 생성
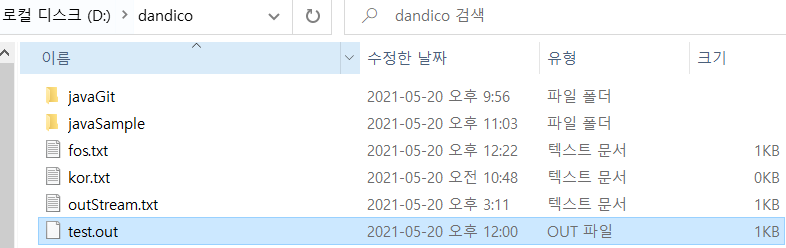
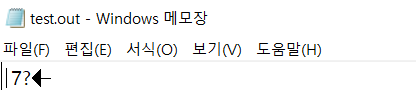
🔈 byte로 작성되었기 때문에 이미지와 같이 메모장으로 열어보면 읽을 수 없는 문자로 보여진다. 하지만 실제 byte 배열 값이 잘 들어간 상태이다
📖 FileOutputStream 예제 (2)
package day19;

import java.io.FileOutputStream;
import java.io.IOException;
import java.util.Date;
import java.util.Scanner;

public class FileOutputEx02 {
	public static void main(String[] args) {

		// 파일 이름과 저장할 문자열 입력받아 파일 생성
		String file, str;
		Date date = new Date();
		Scanner sc = new Scanner(System.in);

		str = "파일 생성 시간 \n\n" + date + "\n\n";
		System.out.println("파일 이름 입력>>"); // d:\\dandico\\fos.txt
		file = sc.nextLine();
		System.out.println("저장할 문자열 입력>>");
		str += sc.nextLine();

		// 파일 저장
		FileOutputStream fos = null;
		try {
			byte[] byte_str =str.getBytes(); // str을 byte[]로 변환
			fos = new FileOutputStream(file); // 스트림 생성
			fos.write(byte_str); // 스트림으로 데이터 파일에 쓰기
			//fos.close(); // 스트림 닫기
		}catch(Exception e) {
			e.printStackTrace();
		}finally{
			if(fos != null) { // fos 객체 생성된게 맞는지 체크하고 닫기
				try { // 예외처리해서
					fos.close(); // 예외가 발생하던 안하던 스트림은 닫혀야 하기 때문에 여기에 작성
				}catch(IOException e) {
					e.printStackTrace();
				}
			}
			if(sc != null) try {sc.close();}catch(Exception e) {e.printStackTrace();}
		}
		System.out.println(file + "파일을 성공적으로 저장했습니다.");
	}
}
📁 파일 생성
🔈 예외처리를 해줘야 하기 때문에 try-catch 외부에서 선언만 미리 해놓기!
📖 FileInputStream 예제 (1)
FileOutnputStream 예제 (1) 에서 만든 test.out 파일 읽어서 출력해보기
package day19;

import java.io.FileInputStream;
import java.io.IOException;

public class FileInputEx01 {

	public static void main(String[] args) {
		FileInputStream fin = null;
		byte[] b = new byte[6]; // 읽어와서 저장할 빈배열
		try {
			// 파일 입력스트림 생성
			fin = new FileInputStream("d:\\dandico\\test.out");
			// 파일 읽어오기
			int i = 0; // 배열 inx 번호로 사용할 변수
			int c; // 읽은 파일을 임시 저장할 변수
			while((c = fin.read()) != -1) { // 파일의 끝 (EOF은 -1리턴)까지 반복해서 읽기
				b[i] = (byte)c;
				i++;
			}
			// 화면에 출력
			for(int a = 0; a < b.length; a++) {
				System.out.print(b[a] + " ");
			}

		}catch(Exception e) {
			e.printStackTrace();
		}finally {
			if(fin != null) try {fin.close();}catch(IOException e) {e.printStackTrace();}

		}
	}
}
🖥️ console 출력 화면
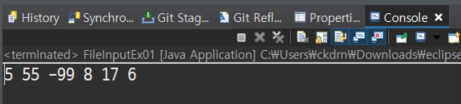
🔈 이전에 test.out 파일을 썼을때 숫자6개가 들어있는 바이트 배열로 만들어 넣었기에 읽어와서 저장할 빈배열도 동일하게 6개로 미리 만들어 놓았다. 여기서 읽을 파일의 내용과 저장할 빈배열 수,길이가 다르면 오류가 나니 주의 해야한다.
📖 FileInputStream 예제 (2)
읽어올 파일 경로 입력받아 내용 콘솔에 출력해보기
package day19;

import java.io.FileInputStream;
import java.io.IOException;
import java.util.Scanner;

public class FileInputEx02 {

	public static void main(String[] args) {

		Scanner sc = new Scanner(System.in);
		System.out.println("읽어올 파일 전체 경로명 입력>> ");
		String file = sc.nextLine(); // 입력 받아오기

		System.out.println("******** " + file + "문서의 내용 ********");
		FileInputStream fis =  null; // 닫아야해서 미리 변수 선언
		int c = 0; // 읽어온 데이터 임시로 담을 변수

		try {
			fis = new FileInputStream(file); // 스트림 객체 생성
			while((c = fis.read())!= -1) { // 읽어와 c에 담고 그 결과가 -1 아니면 반복
				System.out.print((char)c); // 읽어온 문자한개를 출력
			}

		}catch(IOException e){
			e.printStackTrace();
		}finally {
			if(fis !=null) try{fis.close();} catch(IOException e) {e.printStackTrace();}
			if(sc !=null)try{fis.close();} catch(IOException e) {e.printStackTrace();}

		}
	}
}
🖥️ console 출력 화면
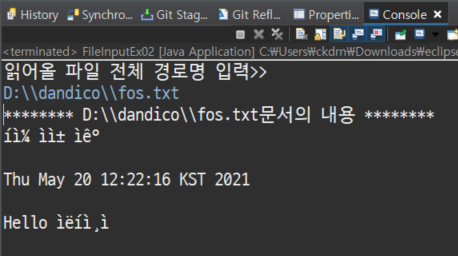
🔈 한글은 byte로 형변환.. ? 표현이 안되기 때문에 이상하게 출력되었다.
📖 InputStreamReader 예제
package day19;

import java.io.FileInputStream;
import java.io.IOException;
import java.io.InputStreamReader;

public class InputReadEx01 {

	public static void main(String[] args) {
		// InputStreamReader : 바이트 스트림을 문자 스트림으로 바꿔주는 보조 클래스
		// 텍스트 파일을 읽기 위한 바이트 파일 입력 스트림

		FileInputStream fin = null; // 파일 특화 바이트스트림
		InputStreamReader in = null;

		try {
			fin = new FileInputStream("d:\\dandico\\fos.txt");
			in = new InputStreamReader(fin); //MS949로도 가능하지만 깨짐
			System.out.println("encoding: " + in.getEncoding());
			int c;
			while((c = in.read()) != -1) {
				System.out.print((char)c);
			}

		} catch (IOException e) {
			e.printStackTrace();
		}finally {
			if(fin != null) try {
				fin.close();
			} catch (IOException e2) {
				e2.printStackTrace();
			}
			if(in != null) try {
				fin.close();
			} catch (IOException e2) {
				e2.printStackTrace();
			}
		}

	}
}
🖥️ console 출력 화면
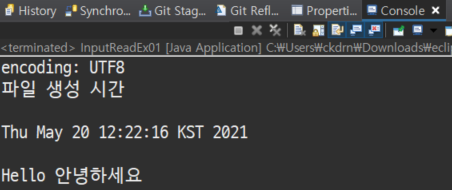
🔈 한글이 깨지지 않고 잘 출력된걸 확인할 수 있다.
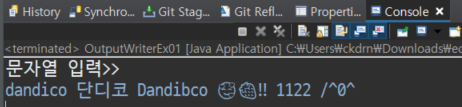
📖 OutputStreamWriter 예제
바이트 스트림을 문자스트림으로 연결시켜주는 역할을 하기에 보조 클래스라 생각하면 이해하기 쉽다.
package day19;

import java.io.FileOutputStream;
import java.io.IOException;
import java.io.OutputStreamWriter;
import java.util.Date;
import java.util.Scanner;

public class OutputWriterEx01 {

	public static void main(String[] args) {

		Scanner sc = new Scanner(System.in);
		Date date = new Date();
		String str = "파일 생성시간: " + date + "\n";
		System.out.println("문자열 입력>> ");
		str += sc.nextLine();

		FileOutputStream fos = null; // 보조 클래스 역할이기에 File~Stream Class도 꼭 생성해줘야함
		OutputStreamWriter out = null;

		try {
			fos = new FileOutputStream("d:\\dandico\\outStream.txt");
			out = new OutputStreamWriter(fos, "UTF-8"); // 출력할것 작성해주고, 인코딩 유형
			out.flush(); // 내부버퍼에만 남는 상황이 발생하지 않도록 flush 해줘야함!
		} catch (IOException e) {
			e.printStackTrace();
		}finally {
			if(fos != null) try {fos.close();} catch(IOException e){e.printStackTrace();}
			if(out != null) try {out.close();} catch(IOException e){e.printStackTrace();}
			if(sc != null) try {sc.close();} catch(Exception e){e.printStackTrace();}

		}

	}

}
🖥️ console 출력 화면
📁 파일 출력 내용 확인
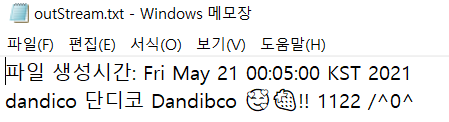
🔈 영어, 숫자는 물론이고 한글, 윈도우에서 제공하는 이모티콘도 잘 출력되었다. 파일 인코딩과 읽어드릴 인코딩 유형이 같아야 깨지지 않고 잘 출력된다. 인코딩 유형을 다르게 하여 출력이 가능하지만 글자가 깨질 확률이 높다.
📖 Thread 예제 (1)
스레드 만들어보기
package day19;

// #1. 스레드 클래스 만들기
class TimerThread extends Thread{
	int n = 0;
	// #2. run 메소드 오버라이딩 : 우리가 만드는 일꾼이 할일 정의
	@Override
	public void run() {
		while(true) {
			System.out.println(n);
			n++;
			try {
				sleep(1000); // 1초에 한번씩 쉬기
			} catch (InterruptedException e) {
				e.printStackTrace();
				return;
			}
		} // while
	} // run
} // class

public class threadEx01 {

	public static void main(String[] args) {
		// #3. 스레드 객체 생성
		TimerThread th = new TimerThread();
		// #4. 스레드 시작!
		th.start();

	}
}
🖥️ console 출력 화면
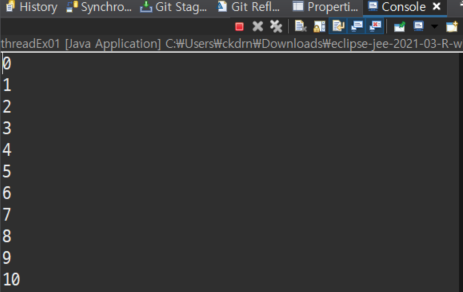
🔈 1초에 한번씩 쉬면서 계속 출력된다. 반복문 종료에 대한 내용의 코드를 적어주지 않아서 계속 실행됨으로 위에 빨간네모를 클릭하여 종료해줘야 한다.
Thread Class 사용순서 잘 기억하기
① 스레드 사용할 클래스 만들어 상속받기
② run메소드 오버라이딩(오버라이딩 안하면 아무일도 일어나지 않게됨)
③ 스레드 객체 생성
④ start 메소드로 실행
📖 Thread 예제 (2)
package day19;
class ThreadEx extends Thread{
	@Override
	public void run() {
		for(int i = 0; i<100; i++) {
			System.out.println("run");
		}
	}
}
public class ThreadEx02 {

	public static void main(String[] args) {

		ThreadEx th = new ThreadEx();
		ThreadEx th2 = new ThreadEx();
		th.start(); // 멀티스레드
		th2.start(); // 멀티스레드
		//th.run(); // 싱글스레드

		for(int i =0; i<100; i++) {
			System.out.println("mmm");
		}
		System.out.println("main 종료!");
	}
}
🖥️ console 출력 화면
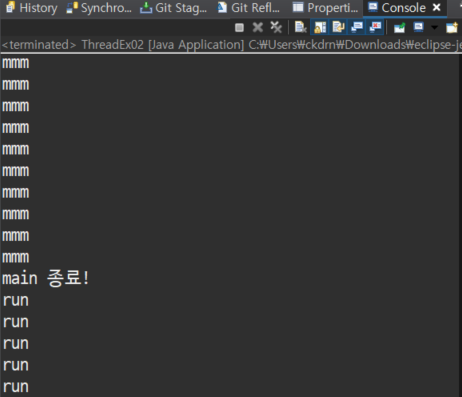
🔈 메인메소드에 따로 Thread가 있기 때문에 동시다발적으로 스레드가 실행된다. th/th2가 실행되고 메인메소드에 있는 기능이 순차적으로 실행되는 것이 아니라 멀티스레드로 같이 진행한다고 볼 수있다. 출력을 확인해보면 출력문이 섞여있으며 마지막에 작성한 main 종료 또한 맨마지막이 아닌 중간에 끼어 출력된걸 확인 가능하다.
'basic > java 실습' 카테고리의 다른 글
| day 18 예제 및 문제 - Iterator<E> 반복자, HaspMap Class … (0) | 2021.05.18 |
|---|---|
| day 17 예제 및 문제 - ArrayList<E>, Vector<E> (0) | 2021.05.18 |
| day 17 예제 및 문제 - Calendar class, Date class (0) | 2021.05.17 |
| day 16 예제 - String 클래스, StringBuffer 클래스, Wrapper 클래스 (0) | 2021.05.17 |
| day 12 연습문제(3) - class(지금까지 배운 것 전부 활용)(난이도상) (0) | 2021.05.14 |